Requirements Management
The Requirements module provides a structured, searchable, and collaborative system for managing architectural specifications, engineering requirements, constraints, goals, and delivery tickets. It bridges the gap between high-level architectural designs and low-level task tracking by enabling bi-directional traceability directly on the diagram canvas.
1. Creating & Editing Requirements
Every item in the requirements catalog represents a specific architectural artifact or engineering task with a persistent, unique identifier.
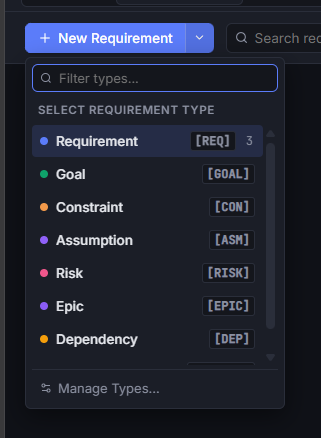
Adding a Requirement Item
- Click the + Requirement (or dropdown arrow) in the top toolbar.
- Select the type of item to create (e.g., Requirement, Goal, Constraint, Risk, Ticket, or custom types).
- The new item is generated with an automatic, sequential ID (such as
REQ-1,GOAL-1,CON-1, orTICKET-1). - Enter a descriptive title and double-click the body area to write specifications.
Workable Items vs. Descriptive Items
The requirements engine distinguishes between two fundamental classes of artifacts:
- Descriptive Artifacts (Requirements, Goals, Constraints, Assumptions, Risks, Epics): Focus on documenting intent, design constraints, and technical scope.
- Workable Artifacts (Tickets or custom workable types): Represent actionable work items. These surface additional planning controls:
- Status Picker: Track progress across
To Do,In Progress, andDone. - Story Points: Estimate effort using point values.
- Sprint / Program Increment: Schedule work into active team sprints.
- Assignee: Assign team members directly from the project team roster.
- Status Picker: Track progress across
2. Managing Types & Relationships
Requirements rarely exist in a silo. The editor supports extensible item types and directional relationships to model dependencies and hierarchy.
Managing Item Types
Click Types in the toolbar to open the item type manager.
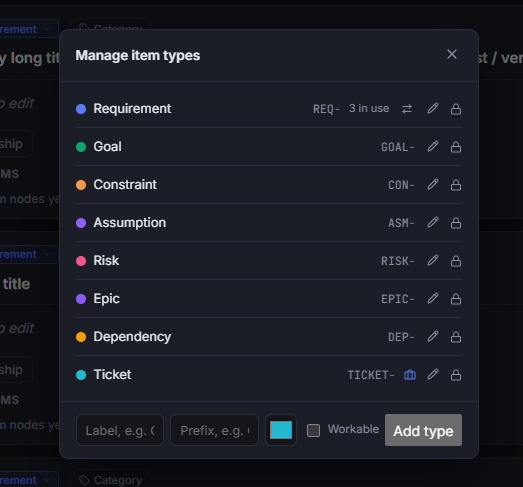
- Built-in Types: Default types include Requirement (
REQ), Goal (GOAL), Constraint (CON), Assumption (ASM), Risk (RISK), Epic (EPIC), Dependency (DEP), and Ticket (TICKET). - Custom Types: Define your own item types with custom labels, ID prefixes (e.g.,
SECfor Security), badge colors, and workable status toggles. - Color Coding: Each type has a distinct color used across requirement cards, diagram badges, and filter views.
Managing Relationship Types
Click Relationships in the toolbar to view and customize relationship types.
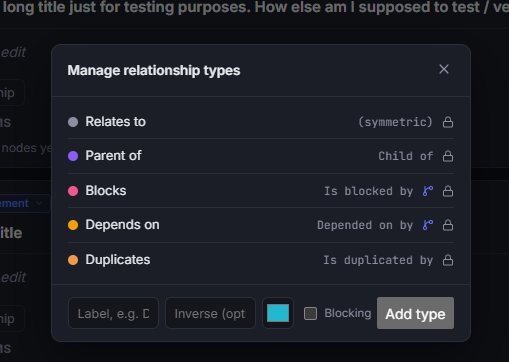
- Relationship Semantics: Define directed relationships with forward and inverse labels (e.g.,
Blocks/Is blocked by,Parent of/Child of,Depends on/Depended on by,Relates to,Duplicates). - Dependency & Cycle Prevention: Relationship types marked as Blocking participate in automatic cycle detection, preventing circular dependency chains (e.g.,
A blocks B blocks C blocks A).
Linking Items Together
Inside any requirement card, expand the relationship section to establish links between items.
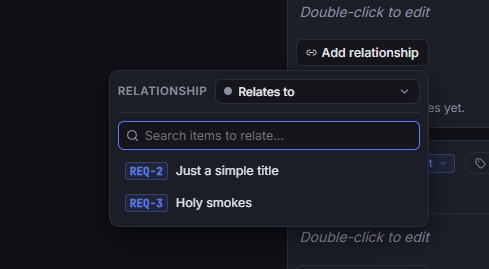
- Select the relationship type (e.g., Blocks, Depends on, Parent of).
- Search and select the target requirement item by ID or title.
- The relationship appears on both items automatically, displaying the proper forward or inverse label.
- Click any linked item ID to jump directly to that requirement card.
3. Categorization & Grouping
Organize large requirement catalogs into functional domains and toggle view layouts.
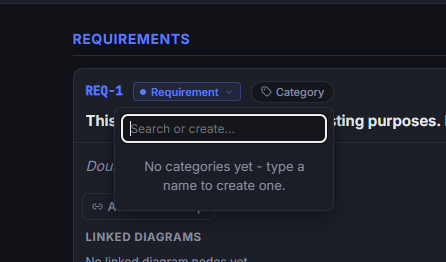
Assigning Categories
- Click the Category pill on any requirement card.
- Select an existing category or type a new name to create and assign it immediately.
- Categories help group requirements by functional subsystem (e.g., Authentication, Payments, Data Pipeline, Infrastructure).
Grouping Views
Toggle between two organization modes using the toolbar controls:
- Group by Type: Groups items by their artifact type (Requirements, Goals, Tickets, etc.).
- Group by Category: Groups items by assigned functional category, with an Uncategorized section for unsorted items.
4. Rich Markdown & Cross-References
Requirement descriptions support full GitHub Flavored Markdown (GFM) alongside inline reference linking.
Markdown Capabilities
- Formatting: Headers, bold, italics, strikethrough, blockquotes, and ordered/unordered lists.
- Tables & Task Lists: Create comparison tables and task checklists (
- [x] Done). - Code Blocks: Formatted syntax blocks for schemas, JSON payloads, and API signatures.
- Soft Breaks: Intuitive newline handling without requiring double trailing spaces.
Cross-Referencing Items (#REQ-ID)
- Type
#in the markdown editor to trigger auto-complete for any existing requirement ID. - The editor resolves references like
#REQ-1or#TICKET-4into interactive navigation buttons. - Clicking a reference in rendered markdown instantly scrolls to and highlights the target requirement card.
5. Searching & Quick Navigation
The toolbar search filter provides fast lookup across the entire requirements repository.
- Multi-Field Search: Filters items instantly by ID, title text, body content, and category name.
- Match Counter & Navigation: Displays matching result counts (
3 of 12) with▲Prev and▼Next buttons. - Keyboard Shortcuts:
Ctrl + F/Cmd + F: Focus the search input.Enter/F3/Cmd + G: Jump to next match.Shift + Enter/Shift + F3: Jump to previous match.Escape: Clear search query.
- Visual Highlight: Matched terms are highlighted across card headers and descriptions.
6. Diagram Traceability & Linked Nodes
The requirements view is tightly integrated with the diagram canvas, ensuring every architectural decision maps to concrete system requirements.

Viewing Connected Components
Each requirement card includes a Linked Diagrams & Components section displaying all canvas nodes associated with that requirement.
- Click any linked component pill to switch directly to the diagram view, automatically navigating to and framing that node (even inside nested sub-diagrams).
Adding Requirements Directly to the Canvas
- In the Linked Diagrams section, click + Add to diagram (or + New linked node).
- This creates a new node on the active diagram canvas that is pre-linked to the requirement.
- Alternatively, you can link existing canvas nodes from the diagram's Inspector panel (see Diagrams Guide).
7. Collaborative Editing & Presence
When collaborating in real-time sessions:
- Active Editors: Visual peer avatar dots indicate when another team member is actively editing a specific requirement.
- Live Sync: Changes to titles, descriptions, categories, and relationships synchronize across connected peers with automatic conflict resolution.